Tuesday, May 17, 2016

EV Conversion Warp 9 Motor Installation

71 VW Karmann Ghia EV Conversion
I installed the Netgain Warp 9 motor (WarP 9 EV Motor Electric Car Motor 72V DC Motor Netgain Motor New ECPC USA Stock from eBay) in the VW. It basically went as planned. I used a jack to slide it under the car and then removed the trunk and suspended the motor using racheting cargo straps. I had to remove part of the sheet metal in front of the trunk latch with an angle grinder to make it fit. The spindle shaft had to be cut down as well for the adapter to fit.
Spindle shaft on VW transaxle

Spindle shaft cut

Two cargo straps were used to wiggle it into position. It wouldn't fit without cutting the rear apron.

Job well done. The tail shaft did not have to be removed.

EV Conversion: Shaft coupler fixed, turned and balanced

71 VW Karmann Ghia EV Conversion
I bought a shaft coupler and adapter plate for the Warp 9 motor to mate with the VW transaxle. The coupler arrived from Wilderness EV and I mounted the clutch. Once I spun it up, I noticed a significant wobble. I sent it back to Brian at Wilderness and he said he would replace it. Instead of replacing it, his mechanic turned the face where the clutch mounts. This fixed the wobble, however, since material was preferentially removed from one side, it caused the coupler to be seriously out of balance.
Shaft coupler with the clutch removed. The face was turned.

Bad vibrations

Rather than send it back again at my expense, I took it to JTL Automotive in Keyport, NJ. They measured 41.2 g out of balance. By welding on weights to one side and shaving down the other he got it to about 4 g out of balance. It looks like garbage but there is no more vibration.
after balancing

adapter plate mounted on the motor - Be sure the plate is aligned properly (rotated) or you will have to remove it later for the installation. You don't want the wire terminals pointing down. The plate fits very tightly, needed to be impacted in place with a hammer and torqued down with the bolts.
clutch mounted again and placed on the motor

Final spin up, looks good!

Friday, May 6, 2016

Warp 9 Motor - checking of advanced timing

71 VW Karmann Ghia EV Conversion
I wanted to make sure the motor timing was properly advanced for the CCWDE use.
The Netgain manual explains how to wire for CCWDE and CWDE. Mine is wired for CCWDE which is the most common rotation. As per the wiring instructions, A1 is connected to S1 and A2 and S2 are connected to power. I use a 12 volt auto battery for bench testing. See: bench test procedure for reference.

WarP 9 EV Motor Electric Car Motor 72V DC Motor Netgain Motor New ECPC USA Stock from eBay

Bolts on the back of the motor

This shows proper alignment. I unscrewewd the bolts on the back of the motor, lifted the cover and made sure it was oriented in the CCW most position. The timing positions rotate the brushes on the commutator. If the timing is advanced it should not be run in reverse.


The markings for the timing are hard to read, they show N for Neutral, CCW, and CW. Advanced timing is used for higher voltages (96Volts or more as per Netgain) in these electric motors.


EV Conversion: More Problems with Shaft Coupler

71 VW Karmann Ghia EV Conversion
Netgain sent me the Warp 9 Motor to replace the Impluse 9. The Warp 9 is a beauty.

I am really unhappy with the progress on the shaft coupler. Brian Wilderness EV agreed to take back the original coupler due to the alignment problem which caused wobbling. See my last post for details.
Instead of sending me back a new one, he turned (resurfaced) the transmission side of the disk. This helped align the adapter, however, by preferentially removing material from one side and not the other, the disk is badly out of balance and vibrates when rotated, especially at high speed. So instead of a wobble, I now have a vibrating shaft coupler. To add insult, I had to pay return shipping on the defective part.
Here is the shaft coupler after it was turned by Wilderness EV.


This video shows the degree of vibration caused by the out of balance shaft coupler.

Thursday, March 31, 2016

Netgain ImPulse 9 Motor Arrives

71 VW Karmann Ghia EV Conversion
I bought the motor from ElectricCarPartsCompany.com
WarP 9 EV Motor Electric Car Motor 72V DC Motor Netgain Motor New ECPC USA Stock from eBay
NetGain ImPulse 9 Motors ImPulse 9 EV DC Motor 
72-156V, 400A 
Double ended shaft - advanced timing, 1.125" DE Shaft, .875" CE Shaft

This is a nice hefty motor. The lugs are 1/2" and the shafts are over 1" diameter. I was thinking of the Warp 9 but the Impulse will probably be easier to fit.
It is too heavy to lift manually. I was able to test it with a 12 volt jumper battery. I couldn't figure which was the front shaft and the tail shaft at first, it turns out the tail shaft is longer than the main shaft. The manufacturor's website has all the diagrams and details that are necessary. Here is the motor with the shaft coupler unit attached to the tail shaft.

Once I spun it up I noticed a significant wobble. This was really disappointing! Here is a video. The problem is that the coupler was welded to the disk with a slight angle, not true 90 degrees. Too much error in the alignment will result in premature motor bearing failure and damage to the transaxle as well.
I called Wilderness EV and sent them the video. At first they said that the wobble was within acceptable specifications. I showed it to a few of my friends and those in the know and they agreed with me that it was defective and needed to be returned. Wilderness then agreed to take it back. I also decided to send back the motor for a Warp 9. Netgain was really good about the return as were the folks at electriccarpartscompany.com.

Tuesday, March 8, 2016

EV Conversion - Electric Karmann Ghia: Car, Chevy Volt batteries, engine removal, shaft coupler preparation

Electric Karmann Ghia - EV Conversion 


Now that I have perfected the electric go cart I would like to move on to something bigger and more fun. I decided to do an electric vehicle conversion of a classic convertible that I can use for cruising in the summer with my family.The idea is to find a cheap, light, old car that has alot of style. Doing an EV conversion would improve performance and reliability and make the car easier to drive. It also reduces emissions.

Please note that this blog is for information only. These are not directions or instructions. Working on cars and especially electric cars can get you injured or killed.

The Car

 I was looking for a lightweight, four seater convertible and manual that could be had for less than $8,000.  I found a 1971 Carmen Ghia on Craigslist.org that fit the bill nicely.


Once I had the car, the next step was picking a configuration and then making a parts list.
I decided on a DC motor because they are cheaper and easier to work with. I decided to use a used battery pack from a Chevy Volt or Nissan Leaf because they are the cheapest way to get a high capacity battery. I ended up finding a Chevy Volt battery in a salvage yard for an amazingly low price. I used the website car-part.com to find the battery.


The Batteries


The Chevy Volt battery pack (13 14 15 CHEVROLET VOLT LITHIUM-ION VOLTAGE BATTERY 16 KWH PACKAGE OEM J from eBay)comes in a T configuration. It is encased in a steel frame on the bottom and a fiberglass top. The top is removed by taking out all of the bolts. Once I did that, it was still tethered by the service disconnect wires.


The service disconnect port. T40 screwdriver was needed to remove.


Here is the battery pack exposed without the top cover. I always wear insulating gloves when working near the batteries.


The batteries are covered by plastic protectors with all of the battery management system wires and connections. This view shows the battery terminals exposed by removing the plastic cover and connectors. Extreme caution must be used when coming near the exposed contacts.


The modules are all connected with hydraulic tubing. The hose clamps were loosened before removing the batteries. There were thru bolts on each side of the battery holding them together as well. This image shows the black bolt pulled out.


There were also straps holding the cells together. On the bottom, there is a metal strip holding the batteries in place. After removing the nuts, the metal can be lifted up to allow the batteries to be removed.


This shows a battery section removed.

Here is the battery pack with one section removed. You can see the hydraulic cooling connectors.


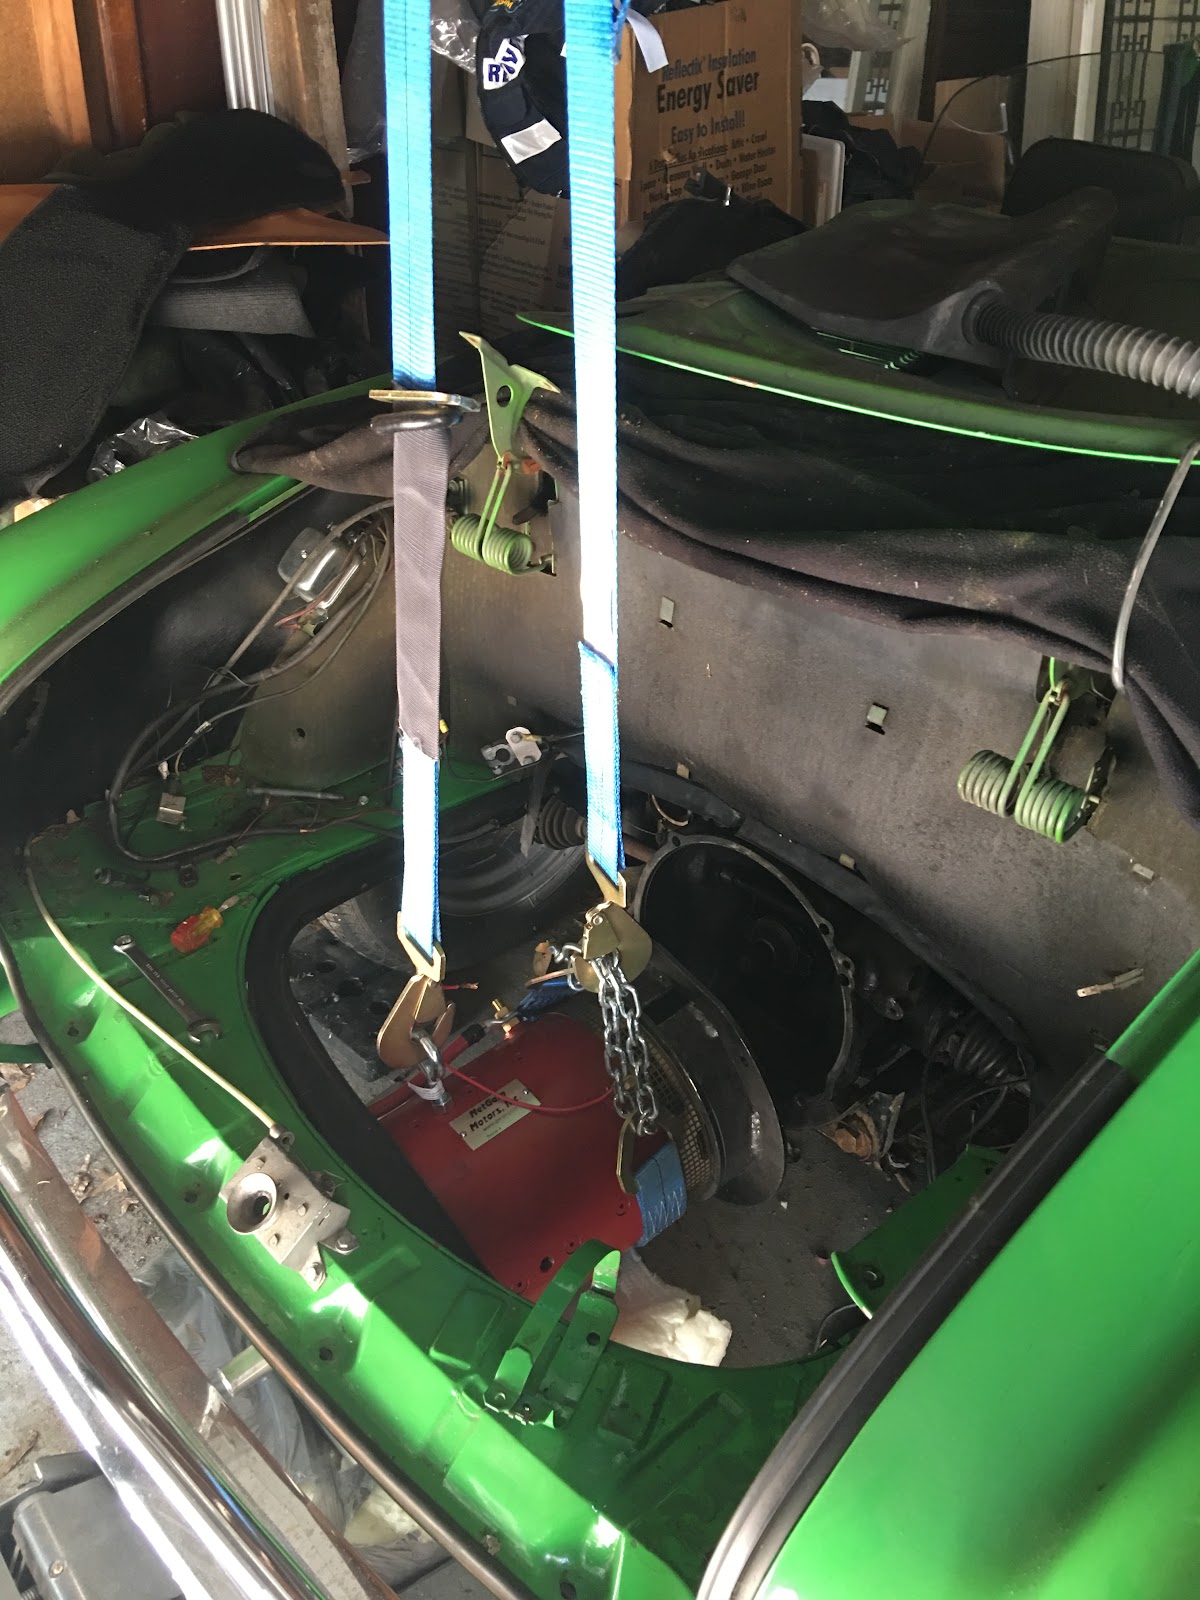
I connected the modules in a parallel configuration using the oem connectors and measured 169.6 volts. That works out 3.53 volts per cell. My plan is to have the battery split into 4 sections of 96 volts and run them in parallel to achieve 192 volts. I figure I can fit 3 sections in the rear, were the engine is and the fourth in the front trunk where the spare tire is.


Removal of Engine and Gas Tank


Now that the batteries have been extracted and set up, next item is to remove the internal combustion engine and gas tank from the Karmann Ghia. This is a view of the engine with the battery and air handler removed.


Here is a views of the car with the gas tank removed from the front.


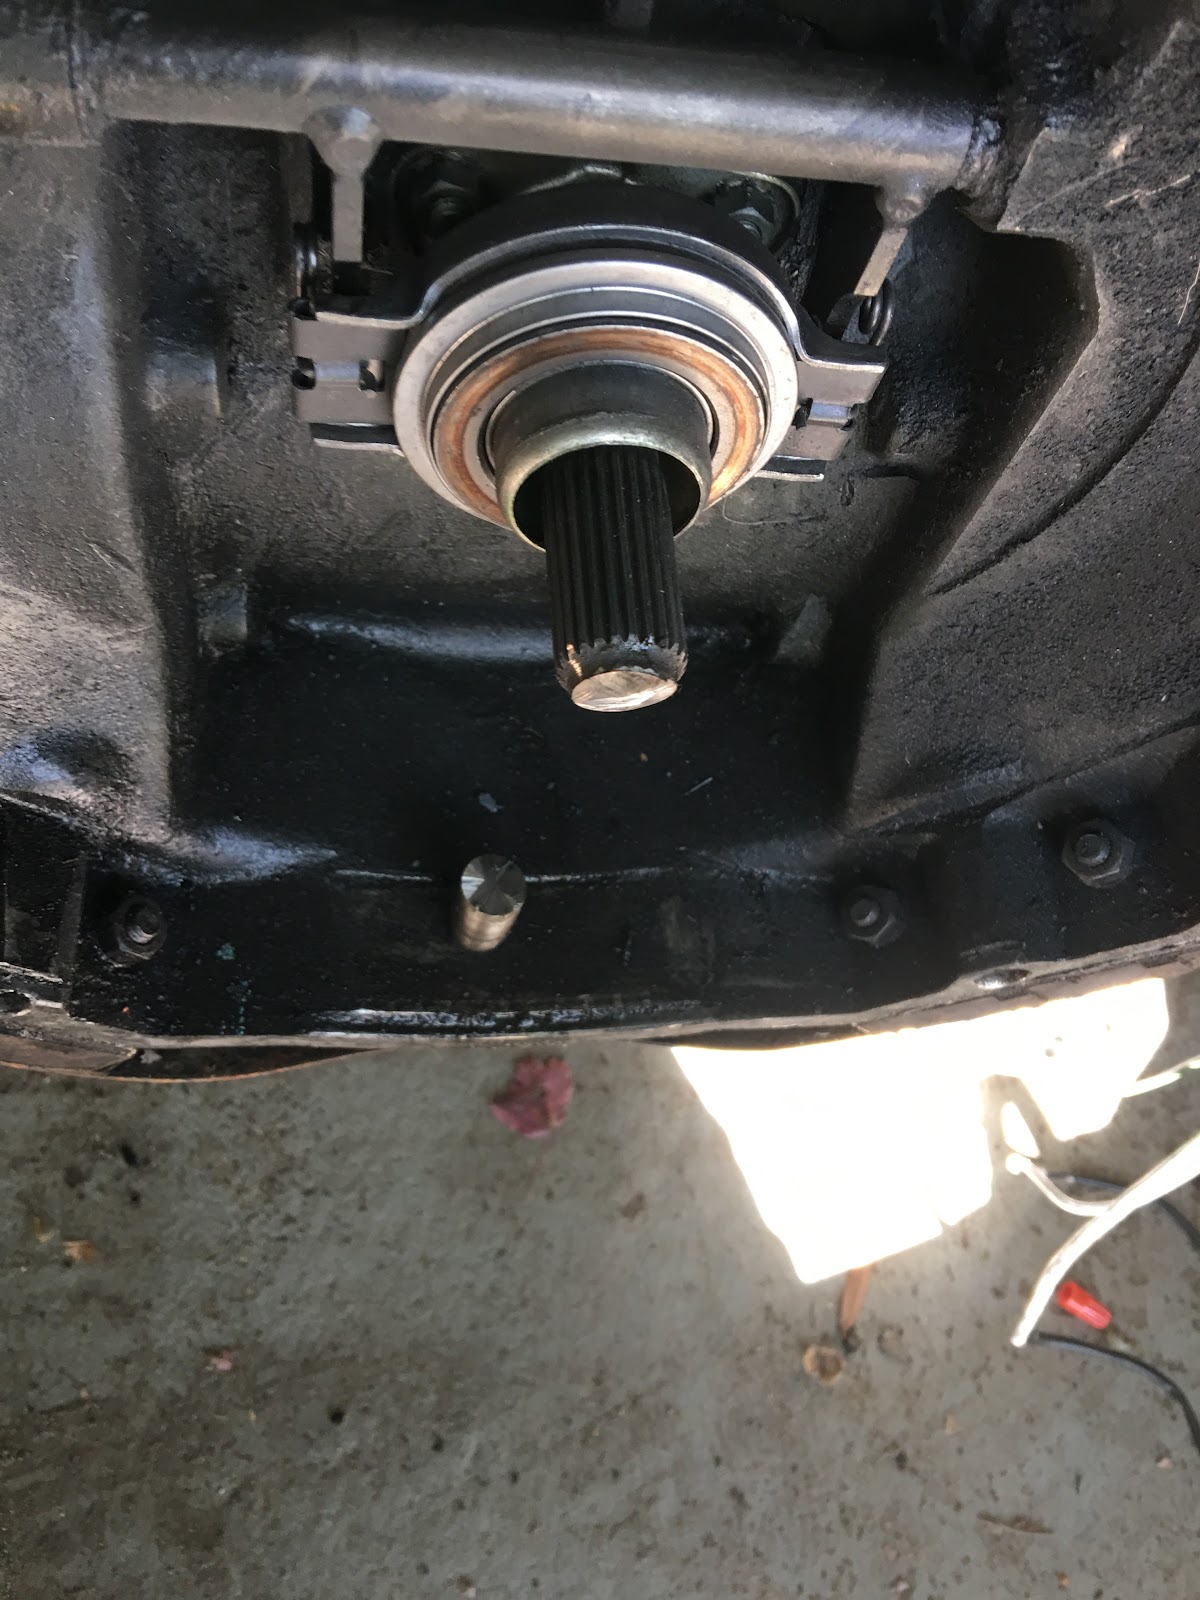
We lifted the car and rested it on cinder blocks with 2x6 lumber on top. We then used a floor jack to lower theengine after disconnecting the four 17mm bolts. It took a while to locate the bolts and get them removed. Once they were out, the engine came off the trans-axle easily.

View from underneath. The car has to be pretty high up to get the engine out. You will notice we had ramps and a 2nd jack set up for safety since the car was not that stable on the concrete blocks alone.

Engine lowered down to the ground with the jack. Job well done. We had enough clearance to roll it out from under the car without hitting anything.


Preparation of Shaft Coupler and Adapter Plate

Now that the car is ready for the electric motor, I had to get the shaft coupler and motor mounting adapter plate ready for installation. I went with a set from Wilderness E.V. The adapter is set up for the Warp 9 or ADC 9 motor and configured for air cooled VW mounting. The coupler uses the existing clutch which is bolted to a plate and then mounted on the transmission along with the motor.

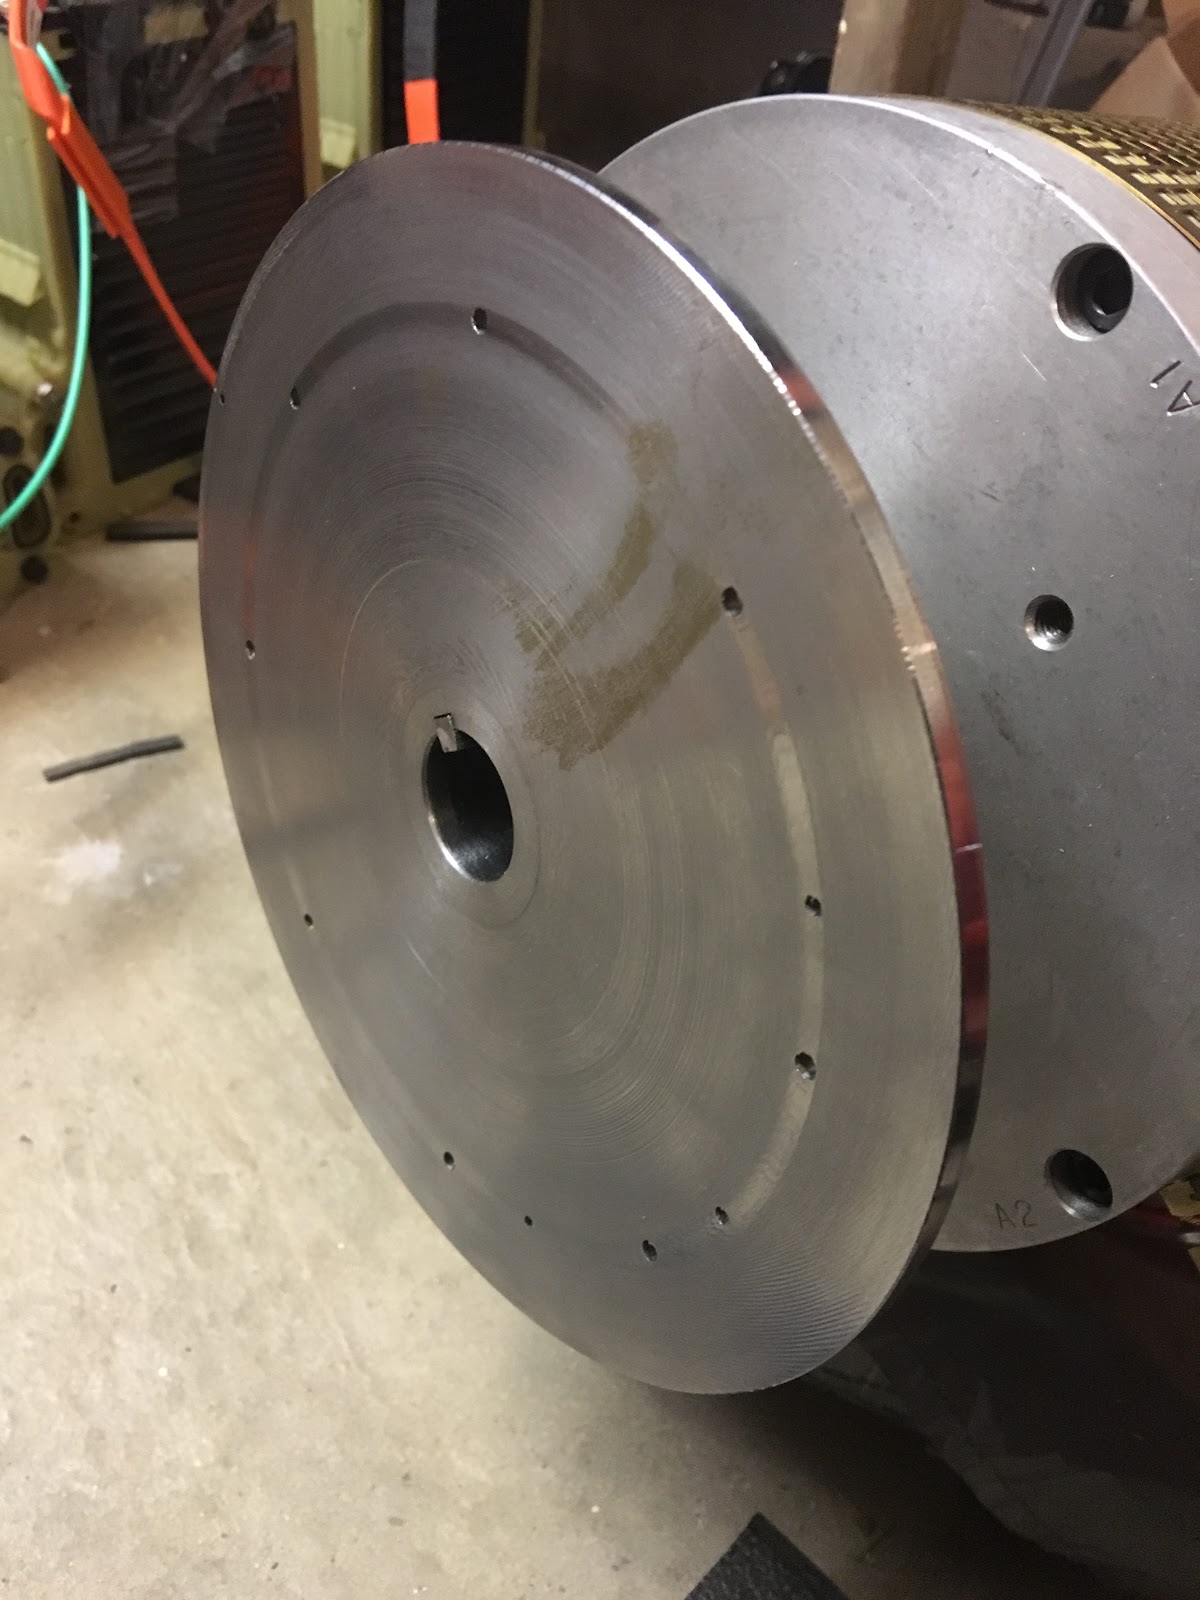
This shows me drilling holes in the shaft coupler plate to match the holes in the clutch disk. I used spray paint to trace the hole location on the disk. I used a drill press because it was impossible to do it by hand.

 Clutch disk with spray paint around the rivet holes.It was really annoying to get the rivets out so that the bolts could be placed.
 This shows the dowel alignment tool that was used to center the clutch disk on the shaft coupler plate. This was given to me by Advance Auto Parts. If the disk is not centered, the plate will wobble and vibrate as the engine speeds up. The dowel tool was wrapped in plastic and tape to snug up the connection.

Supplied bolts are used to attach the shaft coupler plate and clutch. I added washers so that the nuts don't compress into the clutch material.
 I bought new bolts for the motor mounting adapter plate.
 This shows the dowel tool resting on top of the motor mounting plate with the shaft coupler on edge.
 Dowel tool inserted into shaft coupler
 Dowel tool coming through shaft coupler into clutch disk
 Final result, clutch disk mounted to shaft coupler plate, hopefully perfectly centered.


Monday, June 10, 2013

Broken Sprocket - bad welds, repaired

A few weeks ago as my son was riding the go-kart, it broke. As he was speeding over a bump the sprocket came apart. I thought that it wasn't welded sufficiently when I picked it up from Pat at the time. Here is a picture of the broken sprocket. The outer sprocket came with the go-kart and originally attached to the gasoline engine. The inner piece mates to the electric motor.

We had a different welder fix the problem. It took a few weeks but this time I don't think it is breakable. It seems a bit overdone.

The welder put so much metal in the weld that I couldn't seat the nut and washer properly! I used a dremel to clear out the inside area and we are back in business:


That weld is never coming undone.