Sunday, November 27, 2016

Karmann Ghia EV Conversion - Ground Isolation

Proper Isolation of High Voltage System is CRITICAL!

I don't think there is enough information on how to isolate the 12 volt vehicle ground from the high voltage battery pack. When I set up the high voltage system, it was completely isolated from the vehicle electronics by design. The DC/DC converter is one area where the two systems interact, the model I used is an isolated model. The error I made was with the Xantrex battery monitor. It does not isolate the 12 volt negative from the high voltage negative and neither does the voltage prescaler that is required to measure voltages greater than 36 volts.
I figured this out the hard way when I mildly electrocuted myself by touching the chrome bumper with my body while touching the motor which had a residual charge with my arm. At that point I realized that there was a problem. If the systems are isolated, there will be virtually no voltage between the the voltage positive and the body of the vehicle (ground). I traced the problem to the battery monitor. As it turns out, there is an inexpensive and simple solution. It is an isolated DC/DC converter power supply which outputs 12 volts and 1 watt. I bought it on ebay for $6 from China. Unfortunately I had another incident where a tool I was using to secure the high voltage battery shorted to one of the battery leads from the vehicle chassis. This sent current through the battery monitor frying it.

Isolated power supply: DC-DC Converter Isolated Power Module In 10-16V Out 12V DIY Favor

 This type of isolated power supply is a MUST for your EV conversion. It improves the safety of the system and prevents damage to your 12 volt system by a short circuit. You should test your system with a voltmeter to make sure it is truly isolated. There should be no significant voltage when you test the high voltage battery positive and the vehicle ground with a voltmeter. If it reads a high voltage value, you should find the area where the systems are in continuity and isolate them properly.
While we are on the subject of safety, be sure to add as many fuses as you need. Any area where the high voltage system is connecting to something should be fused and the fused should be properly rated for the expected load. For example, the load to the controller may be 400 or 600 amps. The load to the DC/DC converter may be 15 amps and the load to the voltmeter may be 1/2 amp or less. You may also want to place fuses between the batteries especially if they are in separate areas of the vehicle.

Monday, August 1, 2016

Fixing mechanical problems with VW Karmann Ghia EV Conversion - in progress

I took the car out for a first run last week and noticed a few things that need attention.
1. Speed sensor/RPM problem\
2. The rear of the car is about 1.5" too low
3. The transmission is very difficult to shift, very sloppy

I will leave the speed sensor issue for a later post.

Its hard to say how much additional weight is on the rear. I took out the motor and exhaust system (approx $250 lbs) and added 240 lbs of batteries and a 150 lb motor in addition to wires and small electronic accessories (estimate 30 lbs). So I estimate that The rear is 160 lbs heavier than before. This weight compressed the suspension and it is now too low. I ordered Coil Over Shocks and will install them to try to bring the rear up to normal height.

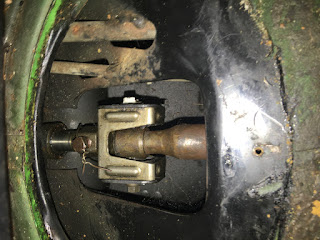
With regards to the sloppy shifter, I read up and found that this is very common on old VW's. The shift rod connects the shifter up front to the transaxle in the rear. There is a shift rod bushing and a hanger up front which seems to wear and break frequently. There is also a shift coupler in the rear  which can also wear out. In my vehicle the bushing was destroyed but the coupler was intact.

Here is my coupler:
It looks pretty good.

This video shows the metal hitting metal from the destroyed bushing up front:


This is what a new bushing kit looks like on amazon:
Once it arrives i will install it and hopefully shifting will be a lot easier.

Friday, July 22, 2016

Preliminary Wiring plan and implementation Karmann Ghia EV Conversion

Before wiring everything together, I researched the proper circuit diagrams. I used the Synkromotive manual along with a diagram published by EV240Z here: http://ev240z.blogspot.com/2014/01/dc-battery-charging-through.html. I bought two screw terminal block strips with 8 positions each to connect the wires from the controller to the various components. The Synkromotive controller has 23 connections but they are not all used so 16 terminals should work.
Here is a page from the Synkromotive manual that I marked up. 

Here is a circuit diagram showing the connections to each of the 8 terminal blocks with numbers on the left side corresponding to the port number from the controller.

This circuit diagram shows the DC relay and 12 volt battery

This circuit diagram shows all of the major components.

I will need to locate some of the existing wires from the VW to connect to the terminal blocks. There is a continuous power line that runs to the ignition switch and there is a line coming back from the ignition switch when it is turned on. There is a relay wire which is powered when the key is turned to on. The chassis ground also needs to be connected. Other wires which need to be located are the reverse light and the brake light. I bought an enclosed DPST switch to activate the charging function.

Here is the front (Chevy Volt) battery. I drilled a 1.25" hole (with a 1.25" bimetal hole saw) where the right side steering column would go and tunneled the wires through. I used 1" Conduit Chase Nipples and locknuts to surround the wires as they pass through the sheet-metal. Once the wires are passed, I will reinstall the gas tank floor so that it can be used for storage or luggage.


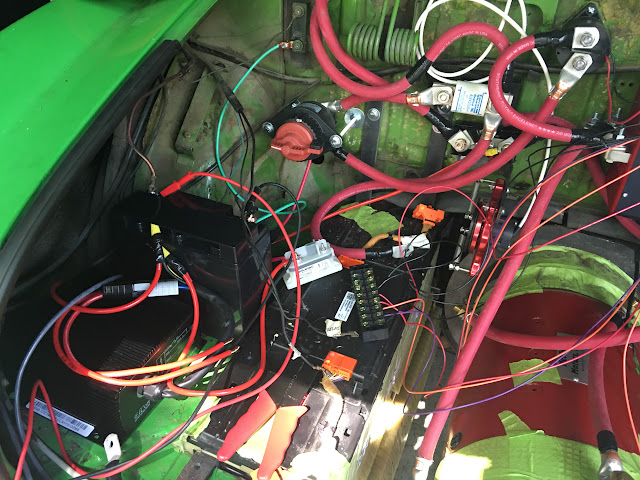
Here is a work in progress view of the wiring of the Synkromotive controller to all of the contactors and the motor and other items. The battery and D/C converter are on the left side as is the wiring to/from the ignition key and existing car fuses. On the right side there are the charging contactors and 12 volt power supply for charging. The service disconnect switch is all the way on the left side. You can also see the battery cables pass through the firewall through a 1" Conduit Chase Nipple and 1" Locknut on the left upper corner. The battery terminals are covered in tape to prevent inadvertent contact and electrocution or shorting.

This view shows the area of the original car wiring, the 12 volt battery, the DC converter and transfer switch. Once all the connections are made and tested I will clean it up.


Thursday, July 14, 2016

Karmann Ghia EV Conversion Parts List - In Progress

Parts:

(view all parts from available from Amazon here: Karmann Ghia EV Conversion Parts List)


Chevy Volt Battery pack
13 14 15 CHEVROLET VOLT LITHIUM-ION VOLTAGE BATTERY 16 KWH PACKAGE OEM J from eBay

Junkyard
$1200

Motor
Netgain Warp 9 EV DC
WarP 9 EV Motor Electric Car Motor 72V DC Motor Netgain Motor New ECPC USA Stock from eBay


ElectricCarPartsCompany.com
$2000

Controller
Synkromotive DC 750 DC Motor Controller
Private party
$1350

Speed Sensor
WarP Motor Speed Sensor Kit
EVSource.com
$99

Throttle
WarP-Drive Hall-Effect Cable-Pull Throttle
EVSource.com
$225

Adapter Plate & Shaft Coupler

Wilderness EV (I do not recommend)
$500 plus cost to make it work properly

Contactors (3)
Gigavac GC200-MA EV Contactor
Gigavac Contactor GV200MA 500+Amp - 12-800 Volt DC -12/24 Volt DC Coil from eBay
EVSource.com
$112 each

Gigavac P105 Mini-Tactor Contactor Relay - 1200 Volts
EVWest.com
$49

Fuse & Holder
Ferraz A30QS500-4H - Ferraz Shawmut 500A 300VDC Fuse w/ Holder
EVSource.com
$91

Ferraz Shawmut A15QS400-4 Fast Acting Current Limiting Semiconductor Fuse (for connections between batteries)
eBay
$30

Ferraz Shawmut ATM5 High Voltage Low Current EV Fuse 600 Volt 5 Amp(for connection between battery pack and DC/DC converter)
eBay
$5

Ferraz Shawmut Rail Mount UltraSafe Fuse Holder High Voltage Low Current (for the ATM5 fuse)
eBay
$4

8 Gauge AWG Inline Maxi Fuse Holder with Waterproof Cover (5/pack) (for 30-40 amp fuses on the 12 volt circuit)
eBay
$13

10 NEW MAXI Car Truck Boat RV Fuse 20,30,40,50,60 AMP (for MAXI fuses)
Amazon
$5

Beetrie 110pcs 5x20mm Quick Blow Glass Tube Fuse Assorted Kit Amp 0.2A 0.5A 1A 2A 3A 5A 6A 8A 10A 15A (forlow current fuses to controller)
Amazon
$6

DIGITEN 5x20mm AGC Fuse Holder Inline screw type with 16 AWG wire (Pack of 10) (for tube fuses)
Amazon
$7

Bussmann ATC-15 Auto Fuse 5-Piece (for 12 volt connections)
Amazon
$5

Parts Express ATC/ATO Water-resistant Fuse Holder - 10 AWG (for ATC fuses)
Amazon
$8

DC/DC Converter
400W 30 Amp Isolated 108-216 Volts (ECDC-HV)
EVWest.com
$229

Gauge
Xantrex Linklite (NEEDS PRESCALER!)
$210

Pre-Scaler
Increase E-Xpert Pro Voltage Input To 350VDC - Passive
EVSource
$56

Inertia Switch
First Technology Inertia Switch
EVWest.com
$53

Disconnect Switch
Gigavac Maintenance Switch HBD41AA 1000V 400A Continuous Hermetically Sealed (Main Switch)
EVWest.com
$78.00

12 Volt power supply (for charging the battery) - HP Proliant DL580 G5 438202-002 DPS-1200FB 1200W Power Supply
HP Proliant DL580 G5 438202-002 DPS-1200FB 1200W Power Supply from eBay
$30 x 2

Charger
ElCon PFC 2000+ Battery Charger (120volt/20 amp)
EVSource.com
$665

LED Replacement Lights:

Headlights
7" Crystal Glass/Metal Headlight CREE SMD COB 360° LED Light Bulb Headlamp Pair - on eBay
eBay
$126


Sidemarker bulbs OE-1895
LUYED 5 x BA9s 3014 30-smd White Color BA9 BA9S 53 57 1895 64111 LED Bulbs used for side door courtesy lights,Map Lights
Amazon
$12

Brake light bulbs OE-1157
LUYED 2 x 800 Lumens Super Bright 1157 2835 33-smd White Color 1157 2057 2357 7528 LED Bulbs used for turn signal lights ,tail lights
Amazon
$13


Misc Parts:
2/0 AWG Wire: 25' 2/0 EXCELENE WELDING CABLE RED USA NEW BATTERY from eBay
1/0 AWG Wire: 0 Gauge 25’ Wire UltraFlex Amplifier Red Ga 1/0 Amp Power/ Ground Cable 25 Ft from eBay
2/0 Wire Lugs 1/2" and 3/8"
10 AWG Wire: Monster Cable 100% OFC Copper 100Ft 10 AWG Gauge Power/Ground/Speaker Car Wire from eBay
M6 threaded rods
3/8 Nuts and Bolts
M10 Bolts
#10 Nuts and bolts
Fuses: Bussmann ATC-15 Auto Fuse 5-PieceAncor Marine Grade Electrical Fuse,
Fuse holder: DIGITEN 5x20mm AGC Fuse Holder Inline screw type with 16 AWG wireParts Express ATC/ATO Water-resistant Fuse Holder - 10 AWG 
Resistor: E-Projects 10EP512100K 100k Ohm Resistors, 1/2 W, 5%
12V 18AH SLA Battery - ExpertPower EXP12180 12 Volt 18 Ah Rechargeable Battery with Nuts and Bolts
Welding wire:  INETUB BA71TGS .035-Inch on 2-Pound Spool Carbon Steel Gasless Flux Cored Welding Wire
Eye bolt to lift motor: Mintcraft LR287 1/2-Inch X 4-Inch Zinc Eye Bolt with Nuts


Tools:
Cable Cutter
Jonard JIC-63050 High Leverage Cable Cutter with Red Handle, 9-1/4" Length


Hydraulic Crimping Tool
8 Ton Hydraulic Wire Crimper Crimping Tool with 9 Dies Battery Cable Lug Terminal Electrical Crimping Tool Kit


Center Punch
TEKTON 6580 Automatic Center Punch

Wednesday, July 13, 2016

EV Conversion: Throttle installation -- connect throttle cable to cable pull throttle

71 VW Karmann Ghia EV Conversion
A gasoline engine has a throttle which controls engine speed. The accelerator pedal pulls on the throttle cable which is typically connected to the carburetor. For an electric conversion, this cable has to pull on a device that signals the controller as to the pedal position. I used the WarP-Drive Hall-Effect Cable-Pull Throttle. This device was tricky to mount because there was nothing to attach it to directly. I bolted a piece of bar steel to the firewall and bent it 90 degrees to serve as a mount for the throttle. I routed the cable through it and used a cable stop to hold it in place. Here is a video of the test run of the throttle.

Monday, July 11, 2016

Rear Battery Installation - Chevy Volt batteries - VW Karmann Ghia

71 VW Karmann Ghia EV Conversion
I decided to do something a little custom to mount the batteries. (I am using Chevy Volt batteries for this project.) 13 14 15 CHEVROLET VOLT LITHIUM-ION VOLTAGE BATTERY 16 KWH PACKAGE OEM J from eBay I probably could have strapped them on top of the rear engine compartment deck and put one or two in the front trunk as others have done. I have see other installations that put the batteries in the area where the rear seats would be. I wanted to accomplisth 2 things with battery placement. 1 not loose seating capacity (keep the rear seats), and not increase the center of gravity or cause too much rear weight distribution.

I decided to drop two of the battery boxes below the rear engine compartment on either side of the electric motor. They are to be approximately as low to the ground as the ICE was before it was removed. I am planning on putting one box in the front cargo area and putting the other remaining box (4 total) above the electric motor in the rear. This plan keeps the center of gravity low while distributing some of the weight forward. This should result in good driving dynamics.

To accomplish this plan, I cut out sections of the rear engine compartment floor with an angle grinder and custom fabricated hangers to hold the battery boxes out of 3/16" x 1" steel bar and M6 threaded rods. I had to reinforce the rear part of the engine deck with welded struts to support the weight.


Rear engine compartment showing space to left and right of the motor where the sheet metal will be cut out to fit the battery boxes.The rear lid was removed to place the motor.


This shows the sheet metal cut to fit the batteries on the right-hand side.


Custom welded battery hangers/ These attach to the batteries using the M6 threaded rods and bolts.

I had to reinforce the rear deck. I welded some pieces of 1/8" steel bar to improve the structure.
This shows a view from underneath the rear deck. Steel struts have been welded to support the batteries.

Here is the final picture showing both rear batteries installed.

Tuesday, May 17, 2016

EV Conversion Warp 9 Motor Installation

71 VW Karmann Ghia EV Conversion
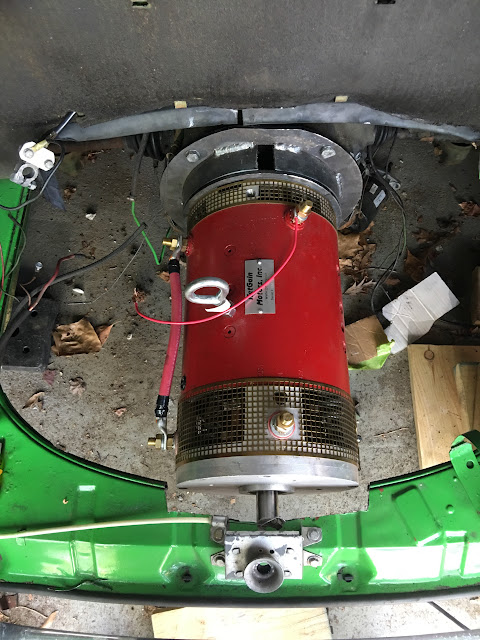
I installed the Netgain Warp 9 motor (WarP 9 EV Motor Electric Car Motor 72V DC Motor Netgain Motor New ECPC USA Stock from eBay) in the VW. It basically went as planned. I used a jack to slide it under the car and then removed the trunk and suspended the motor using racheting cargo straps. I had to remove part of the sheet metal in front of the trunk latch with an angle grinder to make it fit. The spindle shaft had to be cut down as well for the adapter to fit.
Spindle shaft on VW transaxle

Spindle shaft cut

Two cargo straps were used to wiggle it into position. It wouldn't fit without cutting the rear apron.

Job well done. The tail shaft did not have to be removed.

EV Conversion: Shaft coupler fixed, turned and balanced

71 VW Karmann Ghia EV Conversion
I bought a shaft coupler and adapter plate for the Warp 9 motor to mate with the VW transaxle. The coupler arrived from Wilderness EV and I mounted the clutch. Once I spun it up, I noticed a significant wobble. I sent it back to Brian at Wilderness and he said he would replace it. Instead of replacing it, his mechanic turned the face where the clutch mounts. This fixed the wobble, however, since material was preferentially removed from one side, it caused the coupler to be seriously out of balance.
Shaft coupler with the clutch removed. The face was turned.

Bad vibrations

Rather than send it back again at my expense, I took it to JTL Automotive in Keyport, NJ. They measured 41.2 g out of balance. By welding on weights to one side and shaving down the other he got it to about 4 g out of balance. It looks like garbage but there is no more vibration.
after balancing

adapter plate mounted on the motor - Be sure the plate is aligned properly (rotated) or you will have to remove it later for the installation. You don't want the wire terminals pointing down. The plate fits very tightly, needed to be impacted in place with a hammer and torqued down with the bolts.
clutch mounted again and placed on the motor

Final spin up, looks good!

Friday, May 6, 2016

Warp 9 Motor - checking of advanced timing

71 VW Karmann Ghia EV Conversion
I wanted to make sure the motor timing was properly advanced for the CCWDE use.
The Netgain manual explains how to wire for CCWDE and CWDE. Mine is wired for CCWDE which is the most common rotation. As per the wiring instructions, A1 is connected to S1 and A2 and S2 are connected to power. I use a 12 volt auto battery for bench testing. See: bench test procedure for reference.

WarP 9 EV Motor Electric Car Motor 72V DC Motor Netgain Motor New ECPC USA Stock from eBay

Bolts on the back of the motor

This shows proper alignment. I unscrewewd the bolts on the back of the motor, lifted the cover and made sure it was oriented in the CCW most position. The timing positions rotate the brushes on the commutator. If the timing is advanced it should not be run in reverse.


The markings for the timing are hard to read, they show N for Neutral, CCW, and CW. Advanced timing is used for higher voltages (96Volts or more as per Netgain) in these electric motors.


EV Conversion: More Problems with Shaft Coupler

71 VW Karmann Ghia EV Conversion
Netgain sent me the Warp 9 Motor to replace the Impluse 9. The Warp 9 is a beauty.

I am really unhappy with the progress on the shaft coupler. Brian Wilderness EV agreed to take back the original coupler due to the alignment problem which caused wobbling. See my last post for details.
Instead of sending me back a new one, he turned (resurfaced) the transmission side of the disk. This helped align the adapter, however, by preferentially removing material from one side and not the other, the disk is badly out of balance and vibrates when rotated, especially at high speed. So instead of a wobble, I now have a vibrating shaft coupler. To add insult, I had to pay return shipping on the defective part.
Here is the shaft coupler after it was turned by Wilderness EV.


This video shows the degree of vibration caused by the out of balance shaft coupler.

Thursday, March 31, 2016

Netgain ImPulse 9 Motor Arrives

71 VW Karmann Ghia EV Conversion
I bought the motor from ElectricCarPartsCompany.com
WarP 9 EV Motor Electric Car Motor 72V DC Motor Netgain Motor New ECPC USA Stock from eBay
NetGain ImPulse 9 Motors ImPulse 9 EV DC Motor 
72-156V, 400A 
Double ended shaft - advanced timing, 1.125" DE Shaft, .875" CE Shaft

This is a nice hefty motor. The lugs are 1/2" and the shafts are over 1" diameter. I was thinking of the Warp 9 but the Impulse will probably be easier to fit.
It is too heavy to lift manually. I was able to test it with a 12 volt jumper battery. I couldn't figure which was the front shaft and the tail shaft at first, it turns out the tail shaft is longer than the main shaft. The manufacturor's website has all the diagrams and details that are necessary. Here is the motor with the shaft coupler unit attached to the tail shaft.

Once I spun it up I noticed a significant wobble. This was really disappointing! Here is a video. The problem is that the coupler was welded to the disk with a slight angle, not true 90 degrees. Too much error in the alignment will result in premature motor bearing failure and damage to the transaxle as well.
I called Wilderness EV and sent them the video. At first they said that the wobble was within acceptable specifications. I showed it to a few of my friends and those in the know and they agreed with me that it was defective and needed to be returned. Wilderness then agreed to take it back. I also decided to send back the motor for a Warp 9. Netgain was really good about the return as were the folks at electriccarpartscompany.com.

Tuesday, March 8, 2016

EV Conversion - Electric Karmann Ghia: Car, Chevy Volt batteries, engine removal, shaft coupler preparation

Electric Karmann Ghia - EV Conversion 


Now that I have perfected the electric go cart I would like to move on to something bigger and more fun. I decided to do an electric vehicle conversion of a classic convertible that I can use for cruising in the summer with my family.The idea is to find a cheap, light, old car that has alot of style. Doing an EV conversion would improve performance and reliability and make the car easier to drive. It also reduces emissions.

Please note that this blog is for information only. These are not directions or instructions. Working on cars and especially electric cars can get you injured or killed.

The Car

 I was looking for a lightweight, four seater convertible and manual that could be had for less than $8,000.  I found a 1971 Carmen Ghia on Craigslist.org that fit the bill nicely.


Once I had the car, the next step was picking a configuration and then making a parts list.
I decided on a DC motor because they are cheaper and easier to work with. I decided to use a used battery pack from a Chevy Volt or Nissan Leaf because they are the cheapest way to get a high capacity battery. I ended up finding a Chevy Volt battery in a salvage yard for an amazingly low price. I used the website car-part.com to find the battery.


The Batteries


The Chevy Volt battery pack (13 14 15 CHEVROLET VOLT LITHIUM-ION VOLTAGE BATTERY 16 KWH PACKAGE OEM J from eBay)comes in a T configuration. It is encased in a steel frame on the bottom and a fiberglass top. The top is removed by taking out all of the bolts. Once I did that, it was still tethered by the service disconnect wires.


The service disconnect port. T40 screwdriver was needed to remove.


Here is the battery pack exposed without the top cover. I always wear insulating gloves when working near the batteries.


The batteries are covered by plastic protectors with all of the battery management system wires and connections. This view shows the battery terminals exposed by removing the plastic cover and connectors. Extreme caution must be used when coming near the exposed contacts.


The modules are all connected with hydraulic tubing. The hose clamps were loosened before removing the batteries. There were thru bolts on each side of the battery holding them together as well. This image shows the black bolt pulled out.


There were also straps holding the cells together. On the bottom, there is a metal strip holding the batteries in place. After removing the nuts, the metal can be lifted up to allow the batteries to be removed.


This shows a battery section removed.

Here is the battery pack with one section removed. You can see the hydraulic cooling connectors.


I connected the modules in a parallel configuration using the oem connectors and measured 169.6 volts. That works out 3.53 volts per cell. My plan is to have the battery split into 4 sections of 96 volts and run them in parallel to achieve 192 volts. I figure I can fit 3 sections in the rear, were the engine is and the fourth in the front trunk where the spare tire is.


Removal of Engine and Gas Tank


Now that the batteries have been extracted and set up, next item is to remove the internal combustion engine and gas tank from the Karmann Ghia. This is a view of the engine with the battery and air handler removed.


Here is a views of the car with the gas tank removed from the front.


We lifted the car and rested it on cinder blocks with 2x6 lumber on top. We then used a floor jack to lower theengine after disconnecting the four 17mm bolts. It took a while to locate the bolts and get them removed. Once they were out, the engine came off the trans-axle easily.

View from underneath. The car has to be pretty high up to get the engine out. You will notice we had ramps and a 2nd jack set up for safety since the car was not that stable on the concrete blocks alone.

Engine lowered down to the ground with the jack. Job well done. We had enough clearance to roll it out from under the car without hitting anything.


Preparation of Shaft Coupler and Adapter Plate

Now that the car is ready for the electric motor, I had to get the shaft coupler and motor mounting adapter plate ready for installation. I went with a set from Wilderness E.V. The adapter is set up for the Warp 9 or ADC 9 motor and configured for air cooled VW mounting. The coupler uses the existing clutch which is bolted to a plate and then mounted on the transmission along with the motor.

This shows me drilling holes in the shaft coupler plate to match the holes in the clutch disk. I used spray paint to trace the hole location on the disk. I used a drill press because it was impossible to do it by hand.

 Clutch disk with spray paint around the rivet holes.It was really annoying to get the rivets out so that the bolts could be placed.
 This shows the dowel alignment tool that was used to center the clutch disk on the shaft coupler plate. This was given to me by Advance Auto Parts. If the disk is not centered, the plate will wobble and vibrate as the engine speeds up. The dowel tool was wrapped in plastic and tape to snug up the connection.

Supplied bolts are used to attach the shaft coupler plate and clutch. I added washers so that the nuts don't compress into the clutch material.
 I bought new bolts for the motor mounting adapter plate.
 This shows the dowel tool resting on top of the motor mounting plate with the shaft coupler on edge.
 Dowel tool inserted into shaft coupler
 Dowel tool coming through shaft coupler into clutch disk
 Final result, clutch disk mounted to shaft coupler plate, hopefully perfectly centered.